


Get help your way
How do I find my Model Number?
Do you have the original packaging?
-
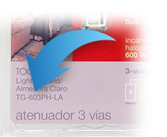
If your product came in plastic packaging (a clamshell), you’ll find the model number on the front of the insert card, on the lower left corner. If your product came in a box, you’ll find the model number on the top of the box.
Most model numbers are 12-16 characters and start with a couple letters followed by a dash.
No packaging? No problem!
-
The product number is on a label on the side of the dimmer or switch.*
If you’ve already installed the dimmer/switch, turn off the electricity and then remove the wallplate. Unscrew and remove the wallplate adapter, then unscrew the dimmer/switch and pull it out of the wall until you can see the label.
*Please note: The product number for Ariadni/Toggler dimmers is not on a label. It’s located directly on the front of the dimmer on the top left, or right below the on/off toggle.

- Browse Components
-
If you don't know your model number, try browsing for it here
If you don't know your model number, try browsing for it here
-
Vive


-
Can I run the low voltage wire in the same conduit as the line voltage wire?
This answer often depends on local codes and the capabilities of the ballast/driver. Local codes that allow Class 2 wiring to be run as Class 1 will call out what is required for reclassification, such as adding Class 1 labels over the Class 2 markings. However, running the 0-10 V signal as Class 1 wiring does introduce some concerns, including noise / interference caused by coupling between the line voltage and low voltage wires. This noise / interference can cause a voltage fluctuation on the 0-10 V wires which can create a difference between the light level requested by the control and the light level signal being received by the ballast / driver. For more information on 0-10V applications, check out our Application Note.
Was this FAQ helpful?Thank you! We appreciate your feedback! -
Can it be on a virtual server?
Yes, as well as a physical server. Please see the IT Implementation Guide .
Was this FAQ helpful?Thank you! We appreciate your feedback! -
How do I default my PowPak?
To default, tap the button indicated in the programming guide 3 times very quickly and hold it down until the unit starts to blink (about 7 seconds). Then tap rapidly another 3-4 times. (The button you tap will be different on each model, which is why we recommend referencing the respective programming guide.)
Was this FAQ helpful?Thank you! We appreciate your feedback! -
How do I default my Wireless Receptacle Control?
To default, tap the On / Off button on the Wireless Receptacle 3 times very quickly and hold until the LED begins to flash rapidly. Within 3 seconds of flashing, release. Then tap the button rapidly another 3 times and the LED will flash slowly indicating that the unit has been reset to factory defaults
Was this FAQ helpful?Thank you! We appreciate your feedback! -
If multiple ballast/LED drivers are being controlled with the TVI-LMF-2A can I have individual control of the units?
If more than one driver is attached, the drivers are controlled as a single zone - individual control of multiple attached drivers will require multiple TVI-LMF-2A interfaces.
Was this FAQ helpful?Thank you! We appreciate your feedback! -
What is required to program the system?
For systems without the Vive hub, no additional equipment is required and programming is done via simple press and hold button programming. When programming with a Vive hub, a Wi-Fi enabled smart device such as a phone, tablet, or PC and an HTML5 compliant web browser (Safari, Chrome, etc.) is required to use the Vive Vue software.
Was this FAQ helpful?Thank you! We appreciate your feedback! -
Can I modify the settings of the built-in occupancy sensor without a Hub?
No its settings come standard without a Hub. Please see the specifications sheet to learn more.
Was this FAQ helpful?Thank you! We appreciate your feedback! -
What sensor programming can be manually adjusted in the Lutron app?
The app allows for adding/removing lights affected by an occupancy group (and changing levels of each affected light) for both occupied and unoccupied actions. This includes setting occupied and/or unoccupied actions to "unaffected" for each individual light.Was this FAQ helpful?Thank you! We appreciate your feedback!
-
How do I default it?
To default, tap the button 3 times very quickly and hold it down until the unit starts to blink (about 7 seconds). Then tap rapidly another 3-4 times.
Was this FAQ helpful?Thank you! We appreciate your feedback! -
What settings can be changed on the sensors themselves?
The following settings can be changed by using the programming buttons found on the sensors.
- Auto-on
- Enabled
- Low-light: The sensor will perform the occupied action only if the turn is relatively dark; if the room is bright, the lights will not turn on.
- Disabled
- Sensitivity level (described as ""Activity"" on the sensor).
- Timeout (1, 5, 15 and 20 min options)
Was this FAQ helpful?Thank you! We appreciate your feedback! - Auto-on
-
Is there any way to disable/override sensors?
The only way to disable a sensor is by manually changing the sensor programming. Removing a light or setting it to "unaffected" will cause it to stop responding to sensors until it is manually re-added.Was this FAQ helpful?Thank you! We appreciate your feedback!
-
What information is available for control, modification, and monitoring via BACnet?
There are many points of information and control that the Vive wireless hub can share via BACnet. Information like energy usage, occupancy status, loadshed status, and light level can be shared with other systems. For functions like initiating loadshed/demand response and changing light levels, the Vive wireless hub can also receive commands from other systems via BACnet. The full details of the BACnet capabilites can be found in the BACnet PIC statement for Vive, located here: https://assets.lutron.com/a/documents/369996.pdf
Was this FAQ helpful?Thank you! We appreciate your feedback! -
Will I be able to upgrade my software later? If so, how?
Yes, Hub software is upgradable. You can access the latest firmware here. Under the section "Vive Hub Firmware." Once the download has completed, you can log into your Vive Hub and under the setting icon "Vive Details" it will have "Update Vive Hub." This typically takes 20 to 30 minutes to complete.
Was this FAQ helpful?Thank you! We appreciate your feedback!