Explore Knowledge Articles

Introducing RadioRA 3
Lutron raises the bar once again. 10 years in the making, RadioRA 3 is a new, game-changing system that promises to transform the way your residential clients look at lighting control.
How do I find my Model Number?
Do you have the original packaging?
-
If your product came in plastic packaging (a clamshell), you’ll find the model number on the front of the insert card, on the lower left corner. If your product came in a box, you’ll find the model number on the top of the box.
Most model numbers are 12-16 characters and start with a couple letters followed by a dash.

No packaging? No problem!
-
The product number is on a label on the side of the dimmer or switch.*
If you’ve already installed the dimmer/switch, turn off the electricity and then remove the wallplate. Unscrew and remove the wallplate adapter, then unscrew the dimmer/switch and pull it out of the wall until you can see the label.
*Please note: The product number for Ariadni/Toggler dimmers is not on a label. It’s located directly on the front of the dimmer on the top left, or right below the on/off toggle.

Get help your way
How do I find my Model Number?
Do you have the original packaging?
-
If your product came in plastic packaging (a clamshell), you’ll find the model number on the front of the insert card, on the lower left corner. If your product came in a box, you’ll find the model number on the top of the box.
Most model numbers are 12-16 characters and start with a couple letters followed by a dash.

No packaging? No problem!
-
The product number is on a label on the side of the dimmer or switch.*
If you’ve already installed the dimmer/switch, turn off the electricity and then remove the wallplate. Unscrew and remove the wallplate adapter, then unscrew the dimmer/switch and pull it out of the wall until you can see the label.
*Please note: The product number for Ariadni/Toggler dimmers is not on a label. It’s located directly on the front of the dimmer on the top left, or right below the on/off toggle.

- Browse Components
-
Applied Filter: Accessories > Fiber Jack > CON-1F-ST
If you don't know your model number, try browsing for it here
6-Port FrameBNC JackCable TV JackFiber JackNetwork PortTelephone JackTelephone PortMaestro DimmersPlug-In DimmerRF Dimming ModuleSunnata DimmersAccessoriesPico WirelessseeTouch KeypadsSunnata KeypadsTable Top KeypadsFluorescent Power ModulePhase Adaptive Power ModuleSwitching Power ModuleRadioRA 3 Processor15 A Receptacles20 A ReceptaclesCeiling SensorsCorner SensorsHallway SensorsMounting AccessoriesWall SensorsAccessoriesMaestro SwitchesRF Relay ModuleSunnata Switches -

RadioRA 3


-
I’m upgrading from RadioRA 2 to RadioRA 3, and my keypads are not able to control the dimmers, what should I do?
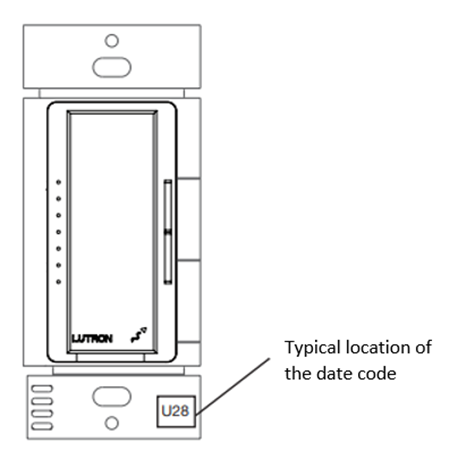
Please check the date code on the dimmers that are not responding to keypad button presses. The date code can be found on the yoke underneath the wallplate and is formatted like this: “T67”. If the date code is T48 or earlier, we understand the nature of this problem and we are developing a fix that will be available in the 22.2 Lutron Designer Software Release. If the date code is newer than T48, please contact Technical Support so we can gather more information.

- I’m upgrading from RadioRA 2 to RadioRA 3, and my picos/sensors are not able to control the dimmers, what should I do?
-
What are some guidelines when upgrading from RadioRA 2 to RadioRA 3?
Below is a series of guidelines to follow when performing an upgrade from RA2 to RA3:
- Do not Out-Of-Box/Factory Default any Main Repeaters. This will cause the devices on the system to become stranded and will require defaulting and reactivating every device in the system.
- Do not keep the original RadioRA 2 Main Repeater(s) on the network while installing and setting up the new RadioRA 3 processor.
-
What do I do about my unsupported devices?
When converting the RadioRA 2 file to RadioRA 3, the software will list which devices are not able to be converted to the new system. These devices will need to be replaced with compatible Clear Connect Type A devices or new Sunnata RF (Clear Connect Type X) devices. In the case of multi-zone controls such as Grafik Eye QS and Wallbox Power Modules, multiple RadioRA 3 devices may need to be added. A direct replacement for Grafik Eye modules is not available within the RadioRA 3 family.
-
What do I do if I encounter device transfer failures when upgrading from RA2 to RA3?
Are the RadioRA 2 Main Repeater(s) still plugged in? If yes, please disconnect the processor, you should not keep the RA2 Main Repeater(s) on the network when installing and setting up a new RA3 processor. If no, did you out of box or default the RA2 main repeaters or any devices? If you did, please default and reactive all the RA2 devices. If the auxiliary repeater fails the device transfer process, factory default and reactivate just the auxiliary repeaters and try again.
-
What steps do I need to take to upgrade from RadioRA 2 to RadioRA 3?
RadioRA 3 is backwards compatible and RadioRA 2 devices, including the Main Repeater, do not need to be factory defaulted. The activation information will be saved when the project is converted to RadioRA 3. Keep installed legacy gear (some exclusions apply) and expand with the new RadioRA 3 devices. When converting the project to RA3 you can skip device activation for dimmers, switches, shades and more if you leave the RA2 system in its previous state. Enable upgrade of existing RadioRA 2: 1) Replace the main repeater & connect bridge with a RadioRA 3 processor. 2) Open the RadioRA 2 File in RadioRA 3 to convert the project. 3) Use the Lutron Designer software to program the system, activate newly added devices, and transfer to the new RadioRA 3 processor.


