


Get help your way
How do I find my Model Number?
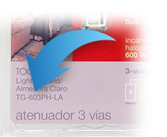
Do you have the original packaging?
-
If your product came in plastic packaging (a clamshell), you’ll find the model number on the front of the insert card, on the lower left corner. If your product came in a box, you’ll find the model number on the top of the box.
Most model numbers are 12-16 characters and start with a couple letters followed by a dash.
No packaging? No problem!
-
The product number is on a label on the side of the dimmer or switch.*
If you’ve already installed the dimmer/switch, turn off the electricity and then remove the wallplate. Unscrew and remove the wallplate adapter, then unscrew the dimmer/switch and pull it out of the wall until you can see the label.
*Please note: The product number for Ariadni/Toggler dimmers is not on a label. It’s located directly on the front of the dimmer on the top left, or right below the on/off toggle.

- Browse Components
-
If you don't know your model number, try browsing for it here
If you don't know your model number, try browsing for it here
- DALI 2 Digital LED Driver
- Hi-lume Driver EcoSystem
- Hi-lume Eco/3-Wire Driver
- Hi-lume Premier
- Hi-lume Premier EcoSystem
- Wireless Node
DALI 2 Digital LED DriverHi-lume Driver EcoSystemHi-lume Eco/3-Wire DriverHi-lume PremierHi-lume Premier EcoSystemWireless Node- A/V Control
- Automated Demand Response Kit
- Contact Closure
- Emergency Lighting
- Wallbox Contact Closure
A/V ControlAutomated Demand Response KitContact ClosureEmergency LightingWallbox Contact Closure- 0-10V ESN
- 0-10V Module
- ALPD-*
- DALI Universal ESN
- DALI Universal Module
- DMX Control Interface
- EcoSystem ESN
- EcoSystem Module
- Phase Adaptive ESN
- Phase Adaptive Module
- Switching ESN
- Switching Module
- T-Series ESN
0-10V ESN0-10V ModuleALPD-*DALI Universal ESNDALI Universal ModuleDMX Control InterfaceEcoSystem ESNEcoSystem ModulePhase Adaptive ESNPhase Adaptive ModuleSwitching ESNSwitching ModuleT-Series ESN- 3-wire Fluorescent
- EcoSystem to 0-10V
- EcoSystem to 3-Wire
- EcoSystem to Switching
- Fixture Mountable Ballast Module
- Phase Adaptive 3-Wire Fluorescent
- Phase-Adaptive
- Switching
- Ten Volt Interface
3-wire FluorescentEcoSystem to 0-10VEcoSystem to 3-WireEcoSystem to SwitchingFixture Mountable Ballast ModulePhase Adaptive 3-Wire FluorescentPhase-AdaptiveSwitchingTen Volt Interface10-Output Shade Power PanelIndividual ShadeQS Link- Athena Wireless Processor
- DIN Rail Processor
- Legacy Panel Interface
- Light Management Hub
- QS Sensor Module
Athena Wireless ProcessorDIN Rail ProcessorLegacy Panel InterfaceLight Management HubQS Sensor Module- Architrave
- Keyswitch
- Palladiom
- Pico Wired
- Pico Wireless
- QSWS2-*
- Signature Series
- Sunnata
- Sunnata Hybrid
- Sunnata Local Controls
- Touchscreen
ArchitraveKeyswitchPalladiomPico WiredPico WirelessQSWS2-*Signature SeriesSunnataSunnata HybridSunnata Local ControlsTouchscreenCeiling OccupancyDaylightDaylight Control PackageHigh Bay OccupancyPartitionWall OccupancyRadio Powr Savr CeilingRadio Powr Savr DaylightRadio Powr Savr Wall -
Athena


-
Can I run 0-10V wires in the same conduit as the line voltage wires?
This answer often depends on local codes and the capabilities of the ballast/driver. Local codes that allow Class 2 wiring to be run as Class 1 will call out what is required for reclassification, such as adding Class 1 labels over the Class 2 markings. However, running the 0-10 V signal as Class 1 wiring does introduce some concerns, including noise / interference caused by coupling between the line voltage and low voltage wires. This noise / interference can cause a voltage fluctuation on the 0-10 V wires which can create a difference between the light level requested by the control and the light level signal being received by the ballast / driver. For more information, check out our Application Note on 0-10V applications.
- Can I use this sensor outside?
-
Do sensors work differently between dimming and switching devices?
Yes, for details on the behavior of sensors when paired with a dimming or switching device refer to the "Getting Started" section on page one of the installation guide.
- Does the QS link (communication link) have to be run as daisy chain?
- How high am I able to mount these sensors?
- How many sensors can I run off of a 24V power pack?
-
If the lights are turned off manually, will they stay off?
The lights will stay off as long as the space stays occupied. If the room becomes vacant and the sensor goes through its time out period, it will then turn the lights on automatically once the room becomes occupied.
- What battery does this use?
- What cable is used for the QS Link?
- What is the battery life for this device?
-
What is the model for replacement button kits?
You can change out any button kit on a seeTouch QS keypad to change the functionality. Below is a list of the different button kits. Please note you will have to change the keypad in the programming to�calibrate the keypad�to the new button configuration: this is done by holding the top and bottom buttons down for 25-30 seconds. Once all status LEDs begin flashing, release and again press the top and bottom buttons for another 5 seconds. Once the status LEDs discontinue from flashing, they keypad has been changed over.
QSWS2R-1BI - 1-button faceplate kit (Insert Style)
QSWS2R-1BIN- 1-button faceplate kit (Non-Insert Style)
QSWS2R-2BI - 2-button faceplate kit (Insert Style)
QSWS2R-2BN - 2-button faceplate kit (Non-Insert Style)
QSWS2R-3BI - 3-button faceplate kit (Insert Style)
QSWS2R-3BN - 3-button faceplate kit (Non-Insert Style)
QSWS2R-5BI - 5-button faceplate kit (Insert Style)
QSWS2R-5BN - 5-button faceplate kit (Non-Insert Style)
QSWS2R-7BI - 7-button faceplate kit (Insert Style)
QSWS2R-7BN - 7-button faceplate kit (Non-Insert Style)
QSWS2R-2BRLI - 2-button faceplate kit w/ raise/lower (Insert Style)
QSWS2R-2BRLN - 2-button faceplate kit w/ raise/lower (Non-Insert Style)
QSWS2R-3BRLI - 3-button faceplate kit w/ raise/lower (Insert Style)
QSWS2R-3BRLN - 3-button faceplate kit w/ raise/lower (Non-Insert Style)
QSWS2R-5BRLI - 5-button faceplate kit w/ raise/lower (Insert Style)
QSWS2R-5BRLN - 5-button faceplate kit w/ raise/lower (Non-Insert Style)
QSWS2R-1RLDI - 3-button and 2-button�faceplate kit w/ raise/lower (Insert Style)
QSWS2R-1RLDN - 3-button and 2-button�faceplate kit w/ raise/lower (Non-Insert Style)
QSWS2R-2RLDI - Dual 2-button faceplate kit w/ raise/lower (Insert Style)
QSWS2R-2RLDN - Dual 2-button faceplate kit w/ raise/lower (Non-Insert Style)
QSWS2R-3BDI - Dual 3-button faceplate kit (Insert Style)
QSWS2R-3BDN - Dual 3-button faceplate kit (Non-Insert Style)
QSWS2R-2BRLIRI - 2-button faceplate kit with IR receiver and raise/lower (Insert Style)
QSWS2R-2BRLIRN - 2-button faceplate kit with IR receiver and raise/lower (Non-Insert Style)
QSWS2R-3BRLIRI - 3-button faceplate kit with IR receiver and raise/lower (Insert Style)
QSWS2R-3BRLIRN - 3-button faceplate kit with IR receiver and raise/lower (Non-Insert Style)
QSWS2R-5BRLIRI - 5-button faceplate kit with IR receiver and raise/lower (Insert Style)
QSWS2R-5BRLIRN - 5-button faceplate kit with IR receiver and raise/lower (Non-Insert Style)
- What type of battery does the Pico remote take?
-
What wallplate should I use?
This device fits behind a standard designer style wallplate: for color and ganging options refer to our designer wallplate and accessories page.
-
Where is the Athena data stored and for how long?
Refer to Lutron�s privacy policy for details.
-
What happens if you mix �auto-on� settings between sensors in the same room?
The auto-on setting of the first sensor in the group to go occupied determines whether or not the lights will turn on; as a result, it is strongly recommended to use the same settings for all sensors in the same room.