


Explore Knowledge Articles

Get help your way
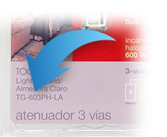
How do I find my Model Number?
Do you have the original packaging?
-
If your product came in plastic packaging (a clamshell), you’ll find the model number on the front of the insert card, on the lower left corner. If your product came in a box, you’ll find the model number on the top of the box.
Most model numbers are 12-16 characters and start with a couple letters followed by a dash.
No packaging? No problem!
-
The product number is on a label on the side of the dimmer or switch.*
If you’ve already installed the dimmer/switch, turn off the electricity and then remove the wallplate. Unscrew and remove the wallplate adapter, then unscrew the dimmer/switch and pull it out of the wall until you can see the label.
*Please note: The product number for Ariadni/Toggler dimmers is not on a label. It’s located directly on the front of the dimmer on the top left, or right below the on/off toggle.

- Browse Components
-
If you don't know your model number, try browsing for it here
-

RadioRA 3


-
How can I get access to the system programming software?
Installers who complete the RadioRA 3 training and pass the exam, will gain access to the system programming software. Software will be accessible after signing to the myLutron Resources page using your myLutron account credentials.
Was this FAQ helpful?Thank you! We appreciate your feedback! -
How can I get specification assistance?
Specification assistance is available through the RadioRA 3 Tech Support Center. Your Local Lutron Sales Representative is also a great resource to aid in specification assistance. Click here to request an appointment with your local Lutron Sales Representative. Lutron offers 24/7 technical support. Need Help? Questions? Call us anytime 1-888-LUTRON1.
Was this FAQ helpful?Thank you! We appreciate your feedback! -
Is RadioRA 3 backwards compatible with RadioRA 2 and RA2 Select? Which devices are compatible and which are non-compatible?
RadioRA 3 has backwards compatibility to enable upgrade existing RadioRA 2 & RA2 Select installations. Convert the existing RadioRA 2 programming by replacing the main repeater & connect bridge with the new RadioRA 3 processor. Compatible (RadioRA 2 & RA2 Select) devices include: Maestro controls (dimmer, switch & fan control)(RRD-6ND, RRD-6CL, -PRO, -10D, -10ND, -F6AN-DV, -2ANF, -8ANS, -8S-DV) , SeeTouch keypads (wall, hybrid and tabletop, and IR version), (RRD-H or -HN, -W3BRL, -W3BSRL, -W3S, -W4S, -W5BRL, -W5BRLIR, -W6BRL, -W7B, -W1RLD, -W2RLD, -W3BD, RR-T5RL, RR-T10RL, RR-T15RL), Pico remotes (PJ2-2B, PJ2-3B, PJ2-2BRL, PJ2-3BRL, PJ2-4B), Lutron shading solutions, Radio Powr Savr sensors (LRF2-OCR2B-P, -VCR2B-P, -OKLB-P, -VKLB-P, -OWLB-P, -VWLB-P, -OHLB-P, -VHLB-P), Lutron RF modules (LMJ-16R-DV-B, -5T-DV-B, -CCO1-24-B), plug-in modules (RR-3PD-1, -15APS-1), tabletop lamp dimmer (RRD-3LD), auxiliary repeater (RR-AUX-REP-WH), Lutron wireless repeater (L-REPPRO-BL), visor control receiver (RR-VCRX), Lutron wireless thermostat (L-HWLV2-WIFI) Non-compatible (RadioRA 2 & RA2 Select) devices include: GRAFIK Eye QS Wireless control unit (QSGRJ-3P, -4P, -6P), GRAFIK T keypad (RRT-GH2B, -GH4B, -GH5B, -GH6B), seeTemp keypad (LRD-WST-F, LRD-WST-C), TouchPRO Wireless temperature control (LR-HWLV-HVAC), Wallbox Power Module (LQRJ-WPM-6P), HVAC controller with wireless temperature sensor (LR-HVAC,INT)
Was this FAQ helpful?Thank you! We appreciate your feedback! -
I’m upgrading from RadioRA 2 to RadioRA 3, and my keypads are not able to control the dimmers, what should I do?
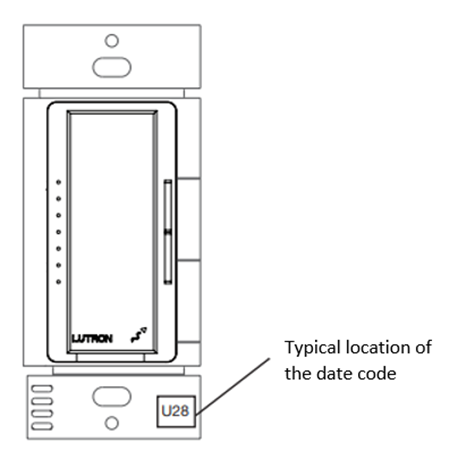
Please check the date code on the dimmers that are not responding to keypad button presses. The date code can be found on the yoke underneath the wallplate and is formatted like this: “T67”. If the date code is T48 or earlier, we understand the nature of this problem and we are developing a fix that will be available in the 22.2 Lutron Designer Software Release. If the date code is newer than T48, please contact Technical Support so we can gather more information.
 Was this FAQ helpful?Thank you! We appreciate your feedback!
 -
I’m upgrading from RadioRA 2 to RadioRA 3, and my picos/sensors are not able to control the dimmers, what should I do?
Make sure the devices are not still paired with the original RadioRA 2 system. If they are, remove them from that system or factory default/out of box devices in question.
Was this FAQ helpful?Thank you! We appreciate your feedback! -
What are some guidelines when upgrading from RadioRA 2 to RadioRA 3?
Below is a series of guidelines to follow when performing an upgrade from RA2 to RA3:
- Do not Out-Of-Box/Factory Default any Main Repeaters. This will cause the devices on the system to become stranded and will require defaulting and reactivating every device in the system.
- Do not keep the original RadioRA 2 Main Repeater(s) on the network while installing and setting up the new RadioRA 3 processor.
Was this FAQ helpful?Thank you! We appreciate your feedback! -
What are the system device limits and range limitations?
Each RadioRA 3 system can have up to 95 seeTouch keypads, Maestro dimmers/switches/fan controls, Pico wireless controls, occupancy sensors, and shades. In addition, systems can have up to 100 Sunnata keypads, dimmers and switches. SeeTouch, Maestro, Pico, Sensor, and shade devices must be within 30ft of the processor or a repeater. Repeaters must be located within 60ft of each other. For Sunnata devices, the processor and each Sunnata device should be within 25ft of two other Sunnata devices. All Sunnata devices should be located within 75ft from the processor.
Was this FAQ helpful?Thank you! We appreciate your feedback! -
What do I do about my unsupported devices?
When converting the RadioRA 2 file to RadioRA 3, the software will list which devices are not able to be converted to the new system. These devices will need to be replaced with compatible Clear Connect Type A devices or new Sunnata RF (Clear Connect Type X) devices. In the case of multi-zone controls such as Grafik Eye QS and Wallbox Power Modules, multiple RadioRA 3 devices may need to be added. A direct replacement for Grafik Eye modules is not available within the RadioRA 3 family.
Was this FAQ helpful?Thank you! We appreciate your feedback! -
What do I do if I encounter device transfer failures when upgrading from RA2 to RA3?
Are the RadioRA 2 Main Repeater(s) still plugged in? If yes, please disconnect the processor, you should not keep the RA2 Main Repeater(s) on the network when installing and setting up a new RA3 processor. If no, did you out of box or default the RA2 main repeaters or any devices? If you did, please default and reactive all the RA2 devices. If the auxiliary repeater fails the device transfer process, factory default and reactivate just the auxiliary repeaters and try again.
Was this FAQ helpful?Thank you! We appreciate your feedback! -
What is Lutron Clear Connect technology and does RadioRA 3 utilize it?
Lutron's ClearConnect wireless communication is ultra-reliable RF technology that ensures seamless communication between system components. It doesn't rely on home Wi-Fi network, so Lutron works even when Wi-Fi is down. Clear Connect Type X allows Lutron devices to function in a mesh network format, while Clear Connect Type A follows a more traditional architecture of requiring Wireless Repeaters to extend range.
Was this FAQ helpful?Thank you! We appreciate your feedback! -
What is the difference between ‘Programming’ vs. ‘Configuration’?
RadioRA 3 offers both a Windows-based programming software and a mobile app. Programming is what is performed within the PC programming software and is a more advanced activity performed by the professional and typically requires training to become proficient. Configuration is available using the Lutron App, allowing for the ability to customize your experience, as either the professional or end user, in a much more simplified user experience.
Was this FAQ helpful?Thank you! We appreciate your feedback! -
What online Training resources are available? How can I become a qualified installer?
You must have a myLutron account to register for training. If you don't have one Click Here to sign up. Access the Radio RA3 Training to become a qualified RadioRA 3 installer.
Was this FAQ helpful?Thank you! We appreciate your feedback! -
What other devices in the Lutron portfolio match the new RadioRA 3 / Sunnata wall control models?
There are design options within the Sunnata RF line for RadioRA 3 Family: the Sunnata RF Dimmer, Sunnata RF Switch, and Sunnata RF keypads (4-button, 3-button with raise/lower, and 2-button). If looking to outfit additional rooms, we offer a matching aesthetic with the stand-alone version of Sunnata (non-RF connected); the Sunnata Touch dimmer (STCL-153P). We also offer accessories with matching color options (wall plates, receptacles, etc.), available at the following link:
Was this FAQ helpful?Thank you! We appreciate your feedback! -
What steps do I need to take to upgrade from RadioRA 2 to RadioRA 3?
RadioRA 3 is backwards compatible and RadioRA 2 devices, including the Main Repeater, do not need to be factory defaulted. The activation information will be saved when the project is converted to RadioRA 3. Keep installed legacy gear (some exclusions apply) and expand with the new RadioRA 3 devices. When converting the project to RA3 you can skip device activation for dimmers, switches, shades and more if you leave the RA2 system in its previous state. Enable upgrade of existing RadioRA 2: 1) Replace the main repeater & connect bridge with a RadioRA 3 processor. 2) Open the RadioRA 2 File in RadioRA 3 to convert the project. 3) Use the Lutron Designer software to program the system, activate newly added devices, and transfer to the new RadioRA 3 processor.
Was this FAQ helpful?Thank you! We appreciate your feedback!